MuseScore MIDI Input
Musescore allows for input of note pitches using a MIDI keyboard. Here is documentation about using MIDI keyboard input while entering music in note input mode in Musescore.
MIDI keyboard setup
Most likely MuseScore will be set up already to work with your MIDI keyboard. If there are problems, then here is how to set up a connection manually:
- Turn on the MIDI keyboard and plug into your computer.
- Open MuseScore.
- Select the MIDI keyboard from menu MuseScore→Preferences...→Audio & MIDI.
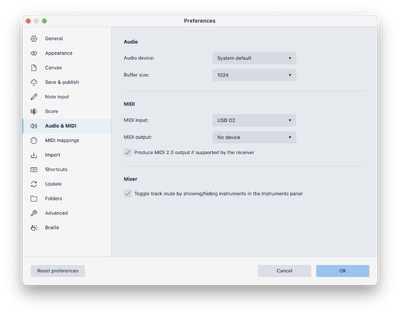
- N.B.: Sometimes the O2 MIDI controllers are not responsive. If so, then unplug them from the USB cable and plug them back in to power-cycle them. This should fix the problem. If you already have MuseScore open, then you probably have to click on the Perference->I/O->Restart Audio and MIDI Devices button to get MuseScore to reacquire the MIDI keyboard.
MIDI input methods
There are three methods of note input via a MIDI keyboard in MuseScore: simple-time input, real-time automatic, and real-time manual.
Step-time input
MuseScore's default note input mode allows you to enter music notation one note (or rest) at a time. Using a MIDI keyboard in note-input mode is very similar to the computer keyboard entry method done in the previous lab, except that the MIDI keyboard is used to enter pitches, while the computer keyboard is used to enter rhythms. The main advantage of using a MIDI keyboard for pitches is that you can enter chords more efficiently.
Rhythms must be entered first before pressing notes on the computer keyboard. 5 = quarter note, and then each number above doubles the duration (6=half note, etc.), and each number less is 1/2 of the previous number (4 = eighth note, etc).
Mapping rhythms to the MIDI keyboard
Instead of typing rhythms on the computer keyboard, you can also assign specific notes on the MIDI keyboard to rhythmic values. To do this, go to the menu item MuseScore→Preferences→MIDI mappings tab. At the top of the MIDI mappings section of the MIDI mappings subwindow, make sure that the "MIDI Remote Control" checkbox at the top of the window is selected:
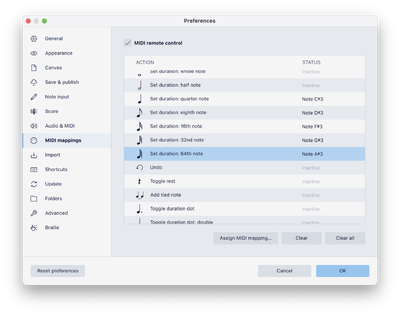
To assign a MIDI note to a particular rhythm, double-click on the rhythm in the MIDI mappings window to open up a MIDI event listener:
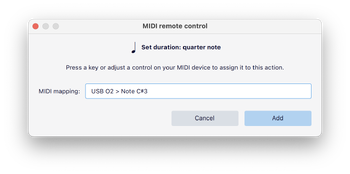
Then press the MIDI note you want to use for selecting quarter-note rhythms (C#3 in this case). Do the same with eighth notes and half notes for the exercises below, if you like.
Another useful mapping is to assign a MIDI key to add augmentation dots to the following notes. Use "0" for rests.
Tips
- To add an augmentation dot to a note, press the "." key on the computer keyboard (or the MIDI keyboard mapping for augmentation dots) before you press the note. The augmentation dot only applies to one note, so it will be deactivated after you enter the next note/chord.
- MuseScore will not automatically add measures when you run out of measures when typing music with the MIDI keyboard, so make sure that you have enough measures already in the editor before you start start entering the music.
Other input modes
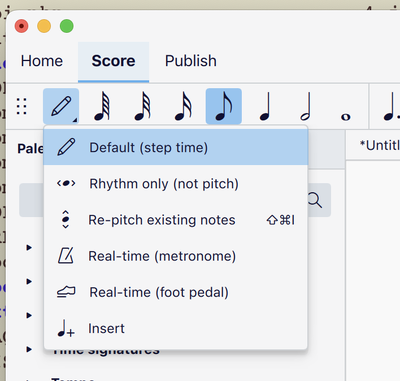
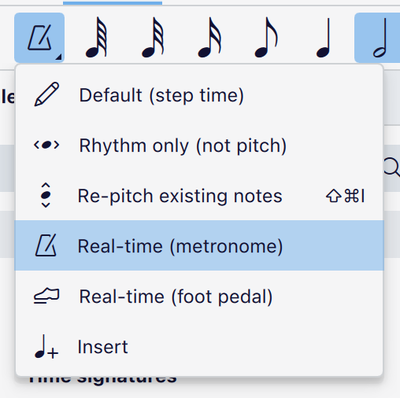
If you click and hold down on the pencil icon, you will see an alternate list of input modes for MuseScore:
Separate rhythm/pitch entry
For complicated rhythms, a two pass system of entering rhythms first and then pitches may be useful. To do this, first select "Rhythms only" after pressing and holding the pencil icon (see about figure).
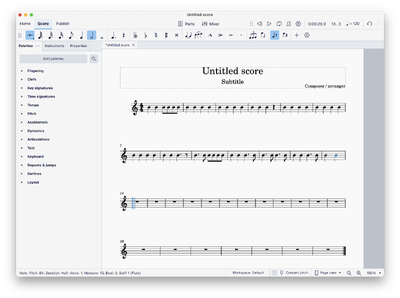
Now select "Re-pitch existing notes", click on the starting note and type in the pitches for the notes (on the MIDI keyboard for this lab, but also computer keyboard letter names is possible):
Then select "Re-pitch existing notes" and type all of the pitches:
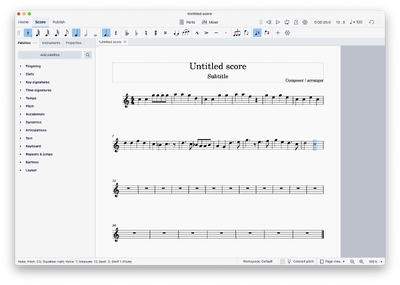
Real-time (metronome) input
Real-time (automatic) input mode allows you to play notes on the MIDI keyboard without the need to type in the rhythms. You select the minimal time unit, and then hold a note for the duration needed for that minimal time unit. For example, to enter a dotted quarter note, select the eighth note rhythm, and then press down a note for three metronome clicks. When you lift up a key, the metronome stops.
- To use real-time (auto) mode, first click on the dropdown menu on the side of the pencil button in the toolbar that represents note-input mode:
- Next, click on the measure that you want to start recording.
- Then choose a metronome rhythmic value from the computer keyboard, such as "5" for quarter note, "4" for eighth note, etc. (which ever is the smallest for your input musical selection).
- Finally, press a note or chord on the MIDI keyboard and hold it for the duration of the rhythm that you selected. If you selected eighth notes and you need a half note duration, then wait for four metronome clicks.
- Lift up the note and press another note/chord to start recording the duration for the next note.
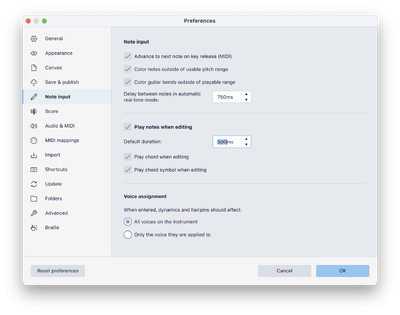
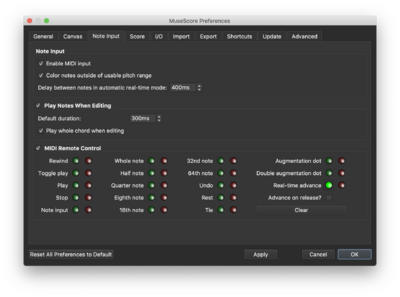
- You can set the tempo rate by going to Preferences→Note Input and changing the number for "Delay between notes in automatic real-time mode. In the following example, the delay was set to 500ms, which is 0.5 seconds, or a tempo of 120 beats per minute:
Note: You will have to enter rests by typing "0" on the computer keyboard or use the remote MIDI function to control rests from the MIDI keyboard. However, you can also set the "Real-time advance to treat a note on the MIDI keyboard as a rest that behaves similar to real notes, where the metronome will click while you hold the duration of the rest. The regular rest on the MIDI remote control acts as a single click rests (such as an eighth note if you are using eighth notes as the metronome time unit).
Real-time (manual) input
Manual real-time input mode is similar to the automatic method, except that you tap the tempo rather than having the computer produce the click track. One advantage is that you can change the tempo while you are entering the music: go slower for more complicated passages, and faster for simpler music.
The default click key is the keypad enter key, but more common would be to use a MIDI key (or foot pedal). To select a MIDI key for tapping, go to Preferences→Note Input, and click on the red button after "Real-time advance". Then press a note or pedal or keyboard button that you want to use as the tapping trigger:
Two-pass rhythm/pitch method
Another input method is to type in the rhythms (either on the computer keyboard or via MIDI keyboard remote control), and then go back and record the pitches either on the computer or MIDI keyboards. This method will be similar to user input in the SCORE notation program that we will cover in a few weeks.
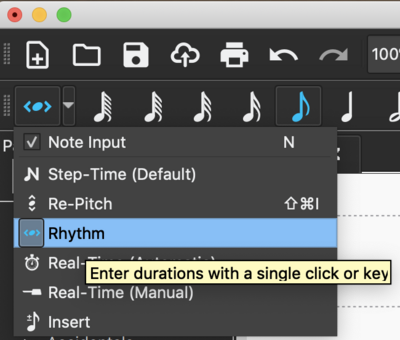
To use rhythm mode, select it from the dropdown menu next to the note-entry button in the toolbar:
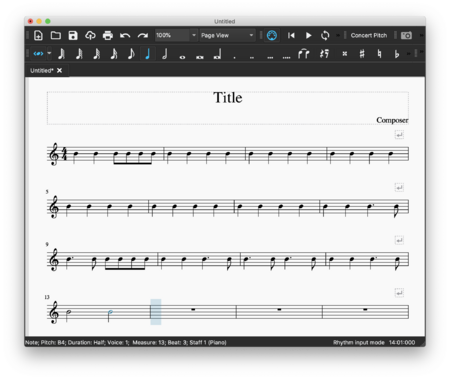
Then type the rhythms of your melody (on any pitch):
Then switch to re-pitch mode, which is used to keep rhythms but change pitches in the music:
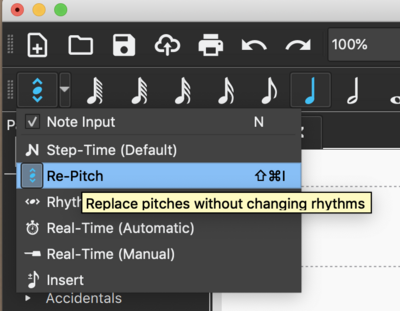
Then click on the first note and type the pitches.
- Note that you have to enter rests in the first page (rhythm stage), and also note that undo does not work when in re-pitch mode.
Exercises
- Input the following music into MuseScore using the input methods described above.

- Speculate on how the speed of entry is related to experience with each input method. In other words, if it takes X minutes to enter a line of music for someone who first uses a particular input system, then how long would you expect someone who has learned that system for one week, one month, and one year?
- Enter about a page of music of your choice into MuseScore using all three input methods described above. Which one works best? How does this compare with entering the music using only the computer keyboard? Which one would work best if you were equally familiar with all input methods? How might the style of the music influence the most efficient input method?
Email the answers to the above exercises to Craig and CC Eleanor.