The CCARH lab has an Epson GT-15000 Scanner which is a relatively fast document scanner. To start scanning, click on the Epson Scan icon () found in the taskbar, or located the program in the program list under "Epson Scan". However, before you actually start the scanning software, you must turn on the scanner itself. It will take about 30 seconds for the scanner to warm up. When you hear the motors move the scanning arm briefly, the scanner will be prepared, and the scanning software can be started (otherwise, the scanning software will complain that it cannot find a scanner and will quit).
When you first start the scanning program, two windows should appear. A smaller one titled "EPSON Scan - EPSON GT-15000" which contains the scanning options, and a larger one titled "Preview" which can be used to adjust the scanning region for documents to be scanned.
Epson Scan option window with Black & White image type selected
On the right is an image of the option window. The "Mode" is set to "Professional Mode" (and generally should stay at that setting). Interesting options are:
Image Type: Use Black & White for 2-tone scanning (Plain text, or as input into SharpEye). 8-bit Grayscale is for black & white photographs, and 24-bit color is for color-photographs or any other color scanning.
Scanning Quality: Draft in Black & White mode seems to be identical to the Best option, but much faster.
Resolution: The scanning resolution. For most purposes 300 dots per inch (DPI) is adequate. Scanning for SharpEye should usually be done in 300 dpi, although 600 dpi is better for music printed in a smaller size (miniature scores for example).
Threshold: For Black & White scanning, the default threshold of 110 is generally too light, particular for stems in graphical music notation. It is best to set this value to 132, although the best choice will depend on other factors such as the type of paper, so you can experiment.
Configuration...: Click on this button to switch the scanning region between portrait and landscape modes.
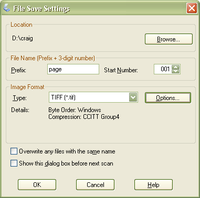
Epson Scan file window. A very important setting is where the scanned images will be saved. There is a small button with a downward pointing black triangle on the right side of the "Scan" button (In the newest version of the Epson scanner which is now installed, there is a small button in approximately the same location). Click on that button, and a "File Save Settings..." entry in a menu appears. Click on that menu item and the "File Save Settings" window will appear (Shown on the left).
In the "File Save Settings" window, first choose the directory (folder) where you want to save the scanned images. In the example image shown on the left, the file will be saved in "D:\craig". When scanning multiple pages, the scanning software will automatically save each file. The filename is built from a fixed Prefix, and a three-digit number which is incremented by one for each scan. Choose the starting number in the Start Number field. For the Image Format, choose the type your particular use requires: JPEG is best for color scans, TIFF is best for SharpEye and high-quality image processing, PDF is best for black & white text scans.
Once all of your options and file save settings have been choose, you are ready to select an area on the scanner to scan. Click on the Preview button at the bottom of the option window. This will cause the Preview window to appear if it is hidden, and a preview of the scanning surface will appear in that window as demonstrated below:
Preview window of the Epson Scan software
Notice that there are two boxes within the scanning region. These are created by click-dragging the mouse. Multiple scanning regions can be created, and the currently active one will be dashed (in this case the box around the page on the left). The other scanning region is shown around the content of the page on the right. This box has a solid border which indicates that it is not the active region. To make a scanning region active, click with the mouse within the box. You can delete a region by pressing the Delete key when the box is active. You can also adjust the dimensions of the box by click dragging on the edges of the box. The box can be moved around on the screen by click-dragging within the center of the box.
Once you have selected the region to scan by creating a scanning region (or no box to scan the entire surface of the scanning bed), you can click on the "Scan" button located in the first window which contains the scanning options. If you have multiple pages to scan, and you can reliably place the new page material within the original scanning box, you do not need to press preview. Instead, you can click on the "Scan" button after you place the next page. Alternatively, you can also press the spacebar on the keyboard as a shortcut to scanning a second time (but the scan button must be pressed the first time for this to work).