Creating SVG images in MuseScore: Difference between revisions
| Line 24: | Line 24: | ||
After selecting the region to keep, go to the menu item Edit → Resize Page to Selection. This will shrink the canvas to the selected area. | After selecting the region to keep, go to the menu item Edit → Resize Page to Selection. This will shrink the canvas to the selected area. | ||
[[File:inkscape-resize-image.png| | [[File:inkscape-resize-image.png|300px|center]] | ||
== Output image from Inkscape == | == Output image from Inkscape == | ||
Revision as of 22:20, 2 September 2020
Here are instructions for creating SVG images of musical notation in MuseScore.
Creating SVG images in MuseScore
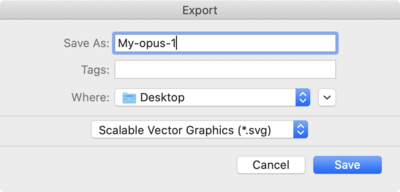
From the File menu in MuseScore, select "Export..." A save dialog window will open up:

Choose "Scalable Vector Graphics (*.svg) as the output file type, and the click on the "Save" button.
Editing the SVG images from MuseScore
A problem with the SVG images saved from MuseScore is that they are full-page SVG images. These need to be cropped in a program such as Inkscape. Here are the steps for doing that in inkscape:
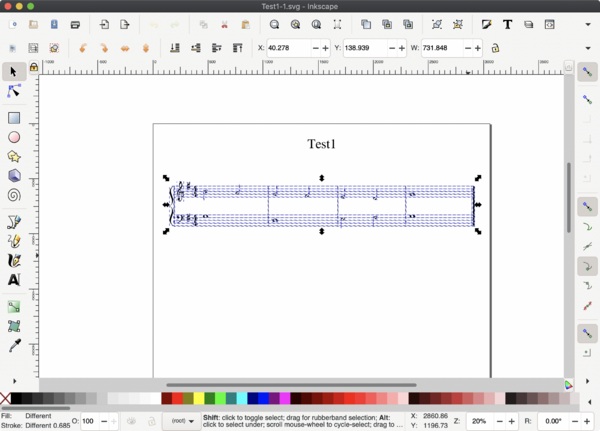
Step 1: Select the region to keep
Select the part of the SVG image that you want to keep in the image:

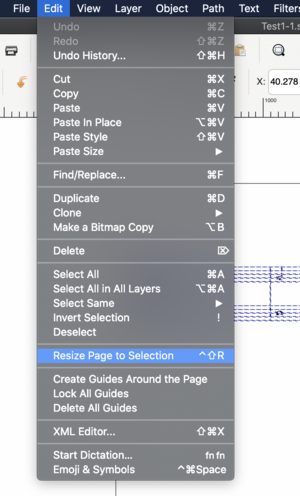
Step 2: Menu: Edit → Resize Page to Selection
After selecting the region to keep, go to the menu item Edit → Resize Page to Selection. This will shrink the canvas to the selected area.

Output image from Inkscape
Here is the final output image from Inkscape scaled to various sizes:


Each of these images are actually PNG image that were created for the specific size from the SVG image. There is probably a way of showing the SVG image directly, but on Wikipedia, SVG images are not allowed to be shown directly in the entries due to security problems that can occur with SVG images (we should not need to worry about that since the CCARH wiki is a close wiki).