Finale parameter editing
Jump to navigation
Jump to search

These exercises are an introduction to fine-detail layout adjustments in Finale.
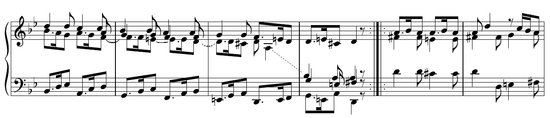
As a first exercise, we will typeset this line of harpsichord music composed by | Buxtehude:

Step 1: Enter the notes
To get started, enter the notes for the music, using your preferred data entry method (Simple, Speedy, HyperScribe, Mouse Clicks). This music has to be entered in multiple layers, so recall from an earlier class the layer buttons on the lower left corner of the main Finale window. The notes in layer 1 will be colored black, layer 2 in red, and layer 3 in green (unless you have changed the color assignments for the layers). Here is an example of what your music should look like after you enter the notes:

Tips for note entry:
- NumPad 9 will change the enharmonic spelling of a note (convert C♯ into D♭, for example).
- For the first measure in layer 3, I added two invisible rests. To create invisible items in Speedy Note Entry, create the rest, then type the letter O to toggle its invisibility. In the above example it can still be seen, but it is in a lighter color green. In the options for Finale, you can make it completely invisible on screen (but then invisible items are hard to find). When you print the music, the invisible object will not be printed.
- When Finale does not position the directions of the stems as you want them (particularly for Layer 3 notes), press the letter L to flip the stem direction of a particular note while you are editing it in Speed Note Entry.
- Press " in Speedy Note Entry to switch between layers with out having to click on the layer buttons in the lower left corner of the window.
- The rests in measure 4 can be adjusted vertically by click-dragging them with the mouse in Speedy Note Entry.